Operations

Operations is the term we use to describe all of the components that go into making a mission successful. It can be divided into three main areas:

Safety

Safety is our first priority. In order to successfully carry out an AEROKATS mission there are several safety considerations that need to be addressed.

Safe Flying Environment and Situational Awareness

Select a place to fly that has adequate space and a minimum number of hazards. Be aware of your surroundings at all times. Know where your team is and what the potential hazards are while you are in the field. Remember that field work is dynamic – the situation around you is always changing. Continually assessing the conditions in the field will minimize the chances of things going unexpectedly wrong. Here are some general guidelines:

  • Select a location that is large enough to fly safely (Minimum Flight Area), and presents a minimum of risks.
  • Avoid flying over people. Hazards can change – be aware of new people entering the flight area.
  • Always be aware of where you are walking. When moving with a kite, it is easy to become distracted by watching the kite. It can be helpful to have a team member watch your footing to help prevent accidents.
  • Be aware of changing weather conditions.
  • Conduct a Hazards Inventory.
  • Be sure to comply with federal and local regulations for tethered kites and balloons.

Flight Area Selection

Identify a location with an adequate Minimum Flight Area. Ideally it will have a relatively flat surface and minimal tripping hazards. Avoid hazards such as power lines, roads, trees and buildings. Avoid crowded areas. Do not fly over people who are not involved in the mission

Minimum Flight Area This is the smallest area where you can safely fly a kite without risk of your kite landing on a power line, road, or other hazard.

Minimum flight area

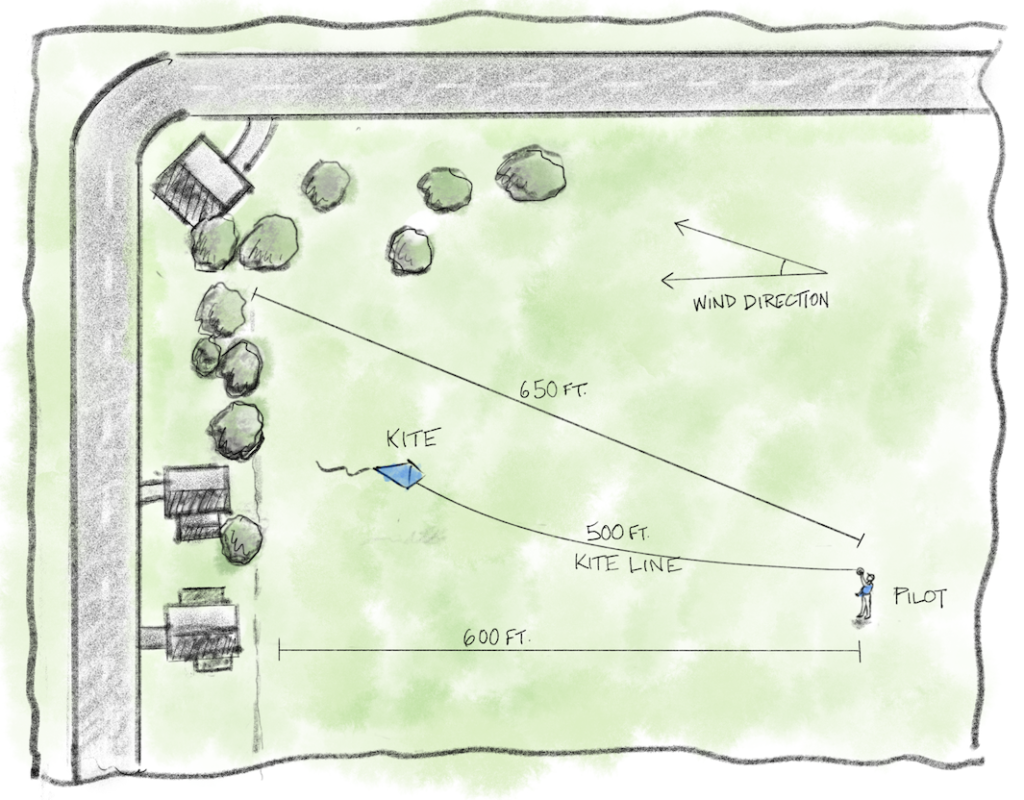
Example: If you have 500ft of line out, you should consider that to be the minimum dimension in the direction of prevailing winds for the field. (I.e., if you are flying in the SW corner of a field and the wind is from the SW, your field should measure at least the length of the line toward the NE. Remember that wind conditions change and you may have to move your position to maintain a safe minimum flight area.

Use special caution if flying near airports. If flying within 2-5 miles of a major municipal airport, it is recommended that you contact the tower to make them aware you will be flying kites. Stay below 500 ft.

Conducting a Hazard Inventory

Prior to the mission, and again during the Pre-Mission Briefing, attempt to identify and articulate all potential hazards in the field. All team members should participate and call out anything they see. A few examples of hazards include:

  • Trip hazards – low lying obstacles or holes in the field
  • Water – standing water, lakes, streams, ice
  • Trees – kite keepers
  • People – other people in the field of operations who are not involved with the mission
  • Structures – buildings / fences /roads / power lines
  • Weather – weather can change quickly, be ready to act
  • Airborne – Planes / helicopters / drones / other kites / birds of prey
  • Other – Anything else that could potentially cause a mishap or injury

The below video takes you through the process of assessing a flying site as well as conducting a hazard inventory of the chosen site:

Flying Site and Hazard Inventory

Regulations:

Weather – Assessing Go/No-Go Conditions

  • Check your local weather forecast the day before you are planning to conduct a mission. (wunderground.com has lots of crowd sourced data and you may be able to find a local station very near you.)
  • Make an initial go/no go decision based on weather forecast.
  • Plan for suitable field attire, sunscreen, bug spray, etc. based on weather forecast
  • Recheck the weather the day of the mission.
  • Do not attempt to fly in rain, or in weather where there is a chance of lightning.
    • Note: A lightning strike indicator is a good tool to carry. It can alert you to lightning when it is still over 25 miles away, giving you a chance to retrieve kites and get to safety. Remember that lightning can travel many miles.
  • Match your kite selection to wind conditions.
    • If winds are too light, your kite may not launch or fly at all. If winds are too strong, your kite or line may break and crash, (along with your expensive Aeropod payload).
    • While every kite has a different performance range, ideal wind conditions for flying delta and delta-conyne kites generally fall between 5-12 mph. Check the specifications for your kite(s) before flying.
    • NOTE: You will need more than the minimum winds if you are going to attach an aeropod. However, the kite can still fail if you exceed maximum recommenced winds
  • Go/No-Go decision
    • Review all criteria on day of mission and make a go/no-go determination based on current conditions and preparedness. (See Pre-Mission Briefing)

Personal Protective Equipment (PPE)

The following is a non-exhaustive list of PPE that should be considered for use in the field. **Items are considered mandatory

  • GLOVES** – mandatory for all individuals who will be handling the kite, line or attaching an Aeropod. Kite lines can easily cause serious cuts, burns and abrasions. (Short-finger sailing gloves are often used for kite flying, as they provide protection for most of the hand while leaving the fingertips exposed for dexterity.)
  • Closed toed shoes** (no sandals)
  • Hats with brims – protection from ticks, biting insects, and block the sun.
  • Sunscreen – protect skin from harmful UV rays.
  • Insect repellent – protection from ticks and biting insects.
  • Sunglasses – protect eyes from harmful UV rays, and reduce glare when looking up.
  • Long sleeved shirts and pants – can also protect from UV rays, biting insects and ticks.
  • Lightning Strike Indicator – highly recommended to provide advance warning of dangerous weather conditions.

Behavior and Line/Equipment Handling

Conducting ourselves in the field in a safe and responsible manor is key to success! A few rules to keep in mind follow:

  • DO NOT RUN!!
  • Sterile cockpit – Make sure all conversation is related only to the task at hand
  • Do not take control of the kite line without positive exchange of control (below)

In Case of Emergencies

It’s important to introduce emergency hypothetical situations to ensure participants will understand how to react in a potential unsafe or scary situation. #1 thing to remember, equipment can always be replaced, people can’t.

Outlined below are a couple examples and how to respond:

  • Kite stuck in tree – If the kite can not be retrieved while standing on the ground, then abandon it where it is. Equipment can easily be replaced.
  • Incoming bad weather – Despite checking the weather before deployment, a nasty storm starts to develop. It’s important to rapidly retrieve the kite from the sky and move indoors.
  • Kite stuck in sky – If the wind picks up and it becomes too difficult to retrieve the kite, continue to fly the kite until the kite dies down enough to safely retrieve.
  • People enter flying space – If someone enters the flying space, it is crucial to have a member of the team inform them of the dangers of being in proximity of the kite.

Preparation

Success in the field depends on adequate preparation.

Assembling Kites and Aeropods

Videos on how to assemble kites and Aeropods:

Leader Line Knots

Attach Swivel to Kite Line

Videos on how to configure a Gitup2 camera and a Kestrel 5500 weather meter:

Configure GitUp2

Configure Kestrel 5500

Videos on how to mount a Gitup camera and assemble an Aeropod:

Insert Gitup in Mount

Assembling Aeropod

Day-of Preparations

  • Verify that the kite and Aeropod are in good working condition
  • Check that the payload is fully charged and calibrated to capture the desired data
  • Verify that each individual has close-toed shoes and gloves and that the roles and responsibilities are defined in advance
  • Inventory required equipment for flight
    • Kite
    • Kite line
    • Gloves
    • Aeropod with payload and leader line
    • Carabiner
    • Flight log book and writing utensil

Videos on how to assemble the Into the Wind Alpine DC, 7ft. Delta kites, and a Frustrationless Flier kite:

Assembling Alpine DC

Assembling 7ft. Delta Kite

Assembling Frustrationless Flyer

Safety Checks

Review the safety guidelines detailed above and verify all are accounted for.

Communication and Teamwork

Communication and teamwork are key to the success of every NASA mission. The same holds true for AEROKATS missions.

Roles and Responsibilities

Each participant should have a preselected and well understood role(s) and responsibilities to facilitate a successful launch. These roles require each individual to exercise teamwork to get the kite in the air and collect data. An AEROKATS flight require at least two people, a pilot and a launcher, but can often include other roles detailed below:

  • Pilot – Holds the kite line and controls the flight of the kite
  • Launcher – Assist the pilot with launching and retrieving the kite
  • Payload Manager – Prepares the Aeropod for data collection and coordinated with the pilot to safely attach the payload to the kite line
  • Data Collector – Collects flight log data either in the booklet or the Survey 123 app
  • Safety Observer – Observes the flight operations and brings to the attention of the team any safety concerns
  • Co-pilot – On days when it’s particularly difficult to launch the kite, a co-pilot can step in after the pilot executes the initial pull to pull the line more and try to generate greater lift

Launch and Retrieval Procedures

During both launch and retrieval it is crucial that all people involved communicate throughout the process to ensure a safe flight.

The video below provides an example of a successful launch and kite retrieval using a carabiner:

AREN Field Operations- Carabiner Retrieval

AREN Field Operations Aeropod Attachment

AREN Field Operations – Long Launch

Positive Exchange of Control

A principle that is reinforced throughout the flight process. It is a carry over from the airplane flight procedures that means that anytime the control of the kite is exchanged, it must be verbalized and agreed upon by both parties before the exchange is made.

It is utilized in several instance when the pilot is not in complete control of the kite: during launch, when the payload is being attached, during retrieval, and is someone takes over the pilot role.

The launch and retrieval videos above provide a couple examples of positive exchange of control.

Data Retrieval and Analysis

Data Retrieval

After a successful flight, the data can be retrieved from the instruments to conduct scientific studies.


Videos demonstrating multiple methods on how to retrieve data from both the Gitup camera and the Kestrel 5500 weather meter:

Gitup2 Data

Kestrel 5500 Data Retrieval

Analysis

Once all the data from the flight and the instruments has been accumulated, the flight data can be uploaded and the analysis of the instrument data can begin. There are a variety of ways that the data can be analyzed to meet the science needs of the group.


Videos demonstrating how to upload flight data to the AREN Mission Mapper and how to conduct a manual image classification:

Submit Flight Data to Mission Mapper

Manual Image Classification

Loading...